> ## Documentation Index
> Fetch the complete documentation index at: https://docs.vast.ai/llms.txt
> Use this file to discover all available pages before exploring further.
# Template Settings
## Overview
This guide documents all settings and options available when configuring a template. Use this guide when you need to understand what a specific setting does or how to configure a particular option.
For a step-by-step tutorial on creating your first template, see [Creating Templates](/guides/templates/creating-templates).
For advanced customization techniques, see [Advanced Setup](/guides/templates/advanced-setup).
## Identification
The first section helps you to keep your templates organized.
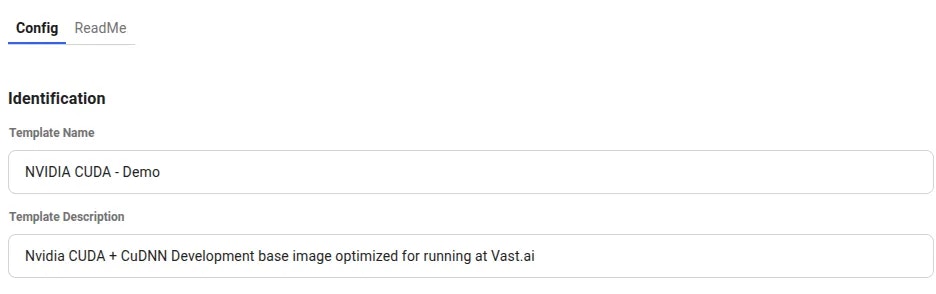 **Template Name**
This will be displayed in bold on the template card. Choose something that helps you identify the template amongst your other templates.
**Template Description**
This field helps describe the function and purpose of the template. Completely optional for your own purposes, but very helpful if you intend to make this template public or share it with others.
## Docker Repository And Environment
This is where you define the Docker image you want to run, along with any options we want to pass into the container.
**Template Name**
This will be displayed in bold on the template card. Choose something that helps you identify the template amongst your other templates.
**Template Description**
This field helps describe the function and purpose of the template. Completely optional for your own purposes, but very helpful if you intend to make this template public or share it with others.
## Docker Repository And Environment
This is where you define the Docker image you want to run, along with any options we want to pass into the container.
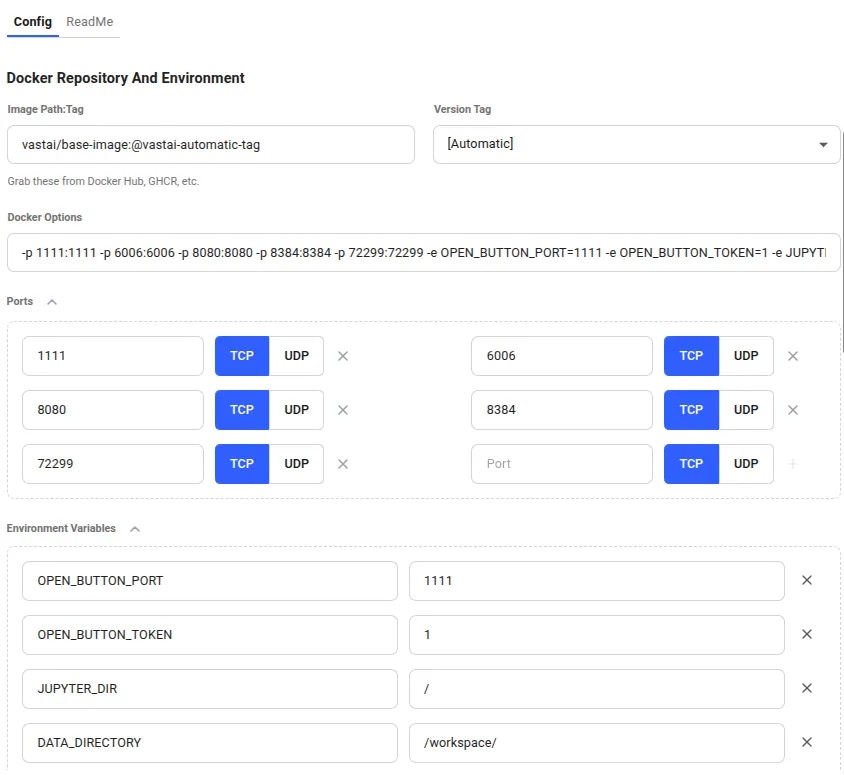 **Image Path:Tag**
Here is where you can define the docker image to run. This field must be in the format `repository/image_name:tag`.
Many of our templates pull from DockerHub but you can use any container registry - Just remember to add the full path if you're using an alternative registry. Eg. `nvcr.io/nvidia/pytorch:25.04-py3`
You can use any Docker image:
* Public images from DockerHub (e.g., `nginx:latest`, `postgres:14`, `python:3.11`)
* Vast.ai base images (e.g., `vastai/base-image`, `vastai/pytorch`)
* Your own custom images from any registry
* Images from alternative registries (GitHub Container Registry, Google Container Registry, etc.)
**Version Tag**
For many registries we are able to pull the available list of tags so this field allows you to quickly select another version.
There is also a special `[Automatic]` tag you can use. With this selected, the machine you choose for your instance will pull the most recent docker image that is compatible with that machine's own CUDA version.
This will only work if the image tag contains the CUDA version string. For example: `my-image-cuda-12.8` would be loaded on a machine supporting CUDA 12.8, but a machine with only CUDA 12.6 would pull `my-image-cuda-12.6`
**Docker Options**
This field is a textual representation of the ports and environment variables declared in the sections beneath it. You can edit it directly or you can use the page widgets.
This field will only accept ports and environment variables. Other docker run options will be ignored.
**Ports**
To access your instance via the external IP address, you will need to add some ports to the template. You can add both TCP and UDP ports.
When your instance is created, a port will be randomly assigned to the external interface which will map into the instance port you selected.
You can also use SSH to open a tunnel to access ports. Use a command like:
```text theme={null}
ssh -p [SSH_PORT] [USER]@[REMOTE_HOST] -L [LOCAL_PORT]:localhost:[REMOTE_PORT]
ssh -p 22 user@remote.example.com -L 8080:localhost:8080
```
The machine will forward traffic from the host machine's public port to the container port you specified.
**Environment Variables**
Here you can add any environment variables that your docker image requires. Do not save any sensitive information here if you are planning to make the template public.
Place any variables with sensitive values into the Environment Variables section of your [account settings page](https://cloud.vast.ai/account/). They will then be made available in any instance you create, regardless of the template used.
Special environment variables like `PROVISIONING_SCRIPT` and `PORTAL_CONFIG` can be used to customize Vast templates - see our [Advanced Setup](/guides/templates/advanced-setup) guide for details.
You can find out more about port mapping and special environment variables in our [Docker Execution Environment](/guides/instances/docker-environment) guide.
## Select Launch Mode
Templates offer three launch modes you can select from. Our recommended templates will usually launch in Jupyter mode for easiest access, but you are free to choose whichever suits your needs.
**Image Path:Tag**
Here is where you can define the docker image to run. This field must be in the format `repository/image_name:tag`.
Many of our templates pull from DockerHub but you can use any container registry - Just remember to add the full path if you're using an alternative registry. Eg. `nvcr.io/nvidia/pytorch:25.04-py3`
You can use any Docker image:
* Public images from DockerHub (e.g., `nginx:latest`, `postgres:14`, `python:3.11`)
* Vast.ai base images (e.g., `vastai/base-image`, `vastai/pytorch`)
* Your own custom images from any registry
* Images from alternative registries (GitHub Container Registry, Google Container Registry, etc.)
**Version Tag**
For many registries we are able to pull the available list of tags so this field allows you to quickly select another version.
There is also a special `[Automatic]` tag you can use. With this selected, the machine you choose for your instance will pull the most recent docker image that is compatible with that machine's own CUDA version.
This will only work if the image tag contains the CUDA version string. For example: `my-image-cuda-12.8` would be loaded on a machine supporting CUDA 12.8, but a machine with only CUDA 12.6 would pull `my-image-cuda-12.6`
**Docker Options**
This field is a textual representation of the ports and environment variables declared in the sections beneath it. You can edit it directly or you can use the page widgets.
This field will only accept ports and environment variables. Other docker run options will be ignored.
**Ports**
To access your instance via the external IP address, you will need to add some ports to the template. You can add both TCP and UDP ports.
When your instance is created, a port will be randomly assigned to the external interface which will map into the instance port you selected.
You can also use SSH to open a tunnel to access ports. Use a command like:
```text theme={null}
ssh -p [SSH_PORT] [USER]@[REMOTE_HOST] -L [LOCAL_PORT]:localhost:[REMOTE_PORT]
ssh -p 22 user@remote.example.com -L 8080:localhost:8080
```
The machine will forward traffic from the host machine's public port to the container port you specified.
**Environment Variables**
Here you can add any environment variables that your docker image requires. Do not save any sensitive information here if you are planning to make the template public.
Place any variables with sensitive values into the Environment Variables section of your [account settings page](https://cloud.vast.ai/account/). They will then be made available in any instance you create, regardless of the template used.
Special environment variables like `PROVISIONING_SCRIPT` and `PORTAL_CONFIG` can be used to customize Vast templates - see our [Advanced Setup](/guides/templates/advanced-setup) guide for details.
You can find out more about port mapping and special environment variables in our [Docker Execution Environment](/guides/instances/docker-environment) guide.
## Select Launch Mode
Templates offer three launch modes you can select from. Our recommended templates will usually launch in Jupyter mode for easiest access, but you are free to choose whichever suits your needs.
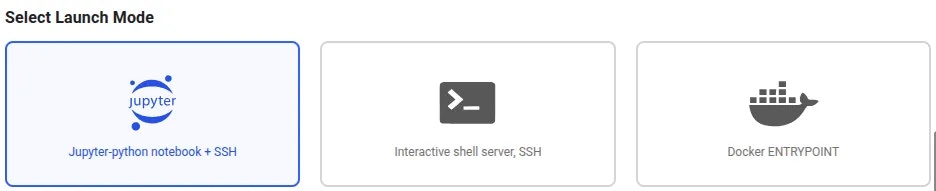 **Jupyter-python notebook + SSH**
When you run the template in this mode, we will install Jupyter and SSH at runtime. Jupyter will be available on mapped port `8080` and SSH will be available on mapped port `22`.
**Interactive shell server, SSH**
As above, but SSH only with no Jupyter installation.
In both Jupyter and SSH mode, the docker entrypoint for your image will not be run. It will be replaced with our instance setup script so you should use the on start section (documented below) to start any services.
**docker ENTRYPOINT**
In this mode, your Docker image will run precisely as it is. We will not include any additional software or access methods. If your Docker image does not offer SSH or another appropriate interface, please select one of the alternative modes if you need to interact with the running instance.
An additional field will be shown when using this launch mode to allow passing arguments to the image entrypoint.
**Jupyter-python notebook + SSH**
When you run the template in this mode, we will install Jupyter and SSH at runtime. Jupyter will be available on mapped port `8080` and SSH will be available on mapped port `22`.
**Interactive shell server, SSH**
As above, but SSH only with no Jupyter installation.
In both Jupyter and SSH mode, the docker entrypoint for your image will not be run. It will be replaced with our instance setup script so you should use the on start section (documented below) to start any services.
**docker ENTRYPOINT**
In this mode, your Docker image will run precisely as it is. We will not include any additional software or access methods. If your Docker image does not offer SSH or another appropriate interface, please select one of the alternative modes if you need to interact with the running instance.
An additional field will be shown when using this launch mode to allow passing arguments to the image entrypoint.
 ## On-start Script
Here you can enter a short Bash script which will be run during instance startup. It is only available when using the Jupyter or SSH launch modes, and is most useful for starting any services that your docker image would have launched if the entrypoint had been executed.
## On-start Script
Here you can enter a short Bash script which will be run during instance startup. It is only available when using the Jupyter or SSH launch modes, and is most useful for starting any services that your docker image would have launched if the entrypoint had been executed.
 **Additional On-start Script Examples**
You can execute custom startup scripts:
```text theme={null}
chmod +x /usr/local/bin/start.sh
bash /usr/local/bin/start.sh
```
You can also overwrite existing files built into the image. Make sure you can switch to a user that has write permissions to that particular file.
For example, you can remove all instances of '-sslOnly' in a particular file using sed:
```text theme={null}
sed -i 's/-sslOnly//g' /dockerstartup/vnc_startup.sh
```
You can also make directories:
```text theme={null}
sudo -i -u kasm-user mkdir -p /home/kasm-user/Desktop
```
Make sure to append environment variables to /etc/environment file in your on-start section because this makes environment variables available to all users and processes and ensures they are persisted even if your instance/docker container is rebooted:
```text theme={null}
env >> /etc/environment
```
Also make sure to find the image's ENTRYPOINT or CMD command and call that command at the end of the on-start section. We overwrite that command to set up jupyter/ssh server, etc. under the hood.
## Extra Filters
Use this area to place restrictions on the machines that should show up in the search page when the template is selected.
**Additional On-start Script Examples**
You can execute custom startup scripts:
```text theme={null}
chmod +x /usr/local/bin/start.sh
bash /usr/local/bin/start.sh
```
You can also overwrite existing files built into the image. Make sure you can switch to a user that has write permissions to that particular file.
For example, you can remove all instances of '-sslOnly' in a particular file using sed:
```text theme={null}
sed -i 's/-sslOnly//g' /dockerstartup/vnc_startup.sh
```
You can also make directories:
```text theme={null}
sudo -i -u kasm-user mkdir -p /home/kasm-user/Desktop
```
Make sure to append environment variables to /etc/environment file in your on-start section because this makes environment variables available to all users and processes and ensures they are persisted even if your instance/docker container is rebooted:
```text theme={null}
env >> /etc/environment
```
Also make sure to find the image's ENTRYPOINT or CMD command and call that command at the end of the on-start section. We overwrite that command to set up jupyter/ssh server, etc. under the hood.
## Extra Filters
Use this area to place restrictions on the machines that should show up in the search page when the template is selected.
 ## Docker Repository Authentication
If you are using a private Docker image then you will need to add authentication credentials so the machine running the instance can download it.
## Docker Repository Authentication
If you are using a private Docker image then you will need to add authentication credentials so the machine running the instance can download it.
 **Docker Registry Server Names**
You don't have to specify docker.io as the server name if your repository is Docker Hub. Docker automatically uses docker.io to pull the image if no other registry is specified.
You do have to specify your server name if your repository is something else. For example:
* GitHub Container Registry (GHCR) - Server Name: `ghcr.io`
* Google Container Registry (GCR) - Server Name: `gcr.io`
## Disk Space
By setting the disk space in the template, you can ensure that new instances created from the template will use this amount as a minimum.
**Docker Registry Server Names**
You don't have to specify docker.io as the server name if your repository is Docker Hub. Docker automatically uses docker.io to pull the image if no other registry is specified.
You do have to specify your server name if your repository is something else. For example:
* GitHub Container Registry (GHCR) - Server Name: `ghcr.io`
* Google Container Registry (GCR) - Server Name: `gcr.io`
## Disk Space
By setting the disk space in the template, you can ensure that new instances created from the template will use this amount as a minimum.
 ## Template Visibility
Any template marked as public will be available in the template search system, while private images will not.
Private templates can still be used by others if you have shared the template URL.
## Template Visibility
Any template marked as public will be available in the template search system, while private images will not.
Private templates can still be used by others if you have shared the template URL.
 Never save a template as public if it contains sensitive information or secrets. Use the account level environment variables as an alternative.
## CLI Command
Templates can be translated directly into CLI launch commands. This read-only area shows what you would need to type or copy to the CLI if you wanted to programatically launch an instance this way.
Never save a template as public if it contains sensitive information or secrets. Use the account level environment variables as an alternative.
## CLI Command
Templates can be translated directly into CLI launch commands. This read-only area shows what you would need to type or copy to the CLI if you wanted to programatically launch an instance this way.
 To learn more about starting instance from the CLI, check out our [quickstart guide](/cli/hello-world).
## Save the Template
Finally, you can save the template. If you are creating a new template or editing one which is not associated with your account - Such as one of our recommended templates - The buttons you see will be labelled 'Create'. For your own templates, you will see them labelled 'Save'
To learn more about starting instance from the CLI, check out our [quickstart guide](/cli/hello-world).
## Save the Template
Finally, you can save the template. If you are creating a new template or editing one which is not associated with your account - Such as one of our recommended templates - The buttons you see will be labelled 'Create'. For your own templates, you will see them labelled 'Save'
 The 'Create' button will create a copy of the template in the 'My Templates' section of the [templates page](https://cloud.vast.ai/templates/) for you to use later. The 'Create & Use' button will save the template, load it and then open up the [offers page](https://cloud.vast.ai/create/).