For users not familiar with Vast.ai’s Serverless engine, we recommend starting with the Serverless Architecture documentation. It will be helpful in understanding how the system operates, processes requests, and manages resources.
Overview & Prerequisites
Vast.ai provides pre-made serverless templates (vLLM, ComfyUI) for popular use cases, and can be used with minimal setup effort. In this guide, we will setup a serverless engine to handle inference requests to a model using vLLM, namely Qwen3-8B , using the pre-made Vast.ai vLLM serverless template. This prebuilt template bundles vLLM with scaling logic so you don’t have to write custom orchestration code. By the end of this guide, you will be able to host the Qwen3-8B model with dynamic scaling to meet your demand.This guide assumes knowledge of the Vast CLI. An introduction for it can be found here.
- A Vast.ai account with credits
- A Vast.ai API Key
- A HuggingFace account with a read-access API token
Setting Up a vLLM + Qwen3-8B Serverless Engine
1
Configure User Environment Variables
Navigate to the user account settings page here and drop down the “Environment Variables” tab. In the Key field, add “HF_TOKEN”, and in the Value field add the HuggingFace read-access token. Click the ”+” button to the right of the fields, then click “Save Edits”.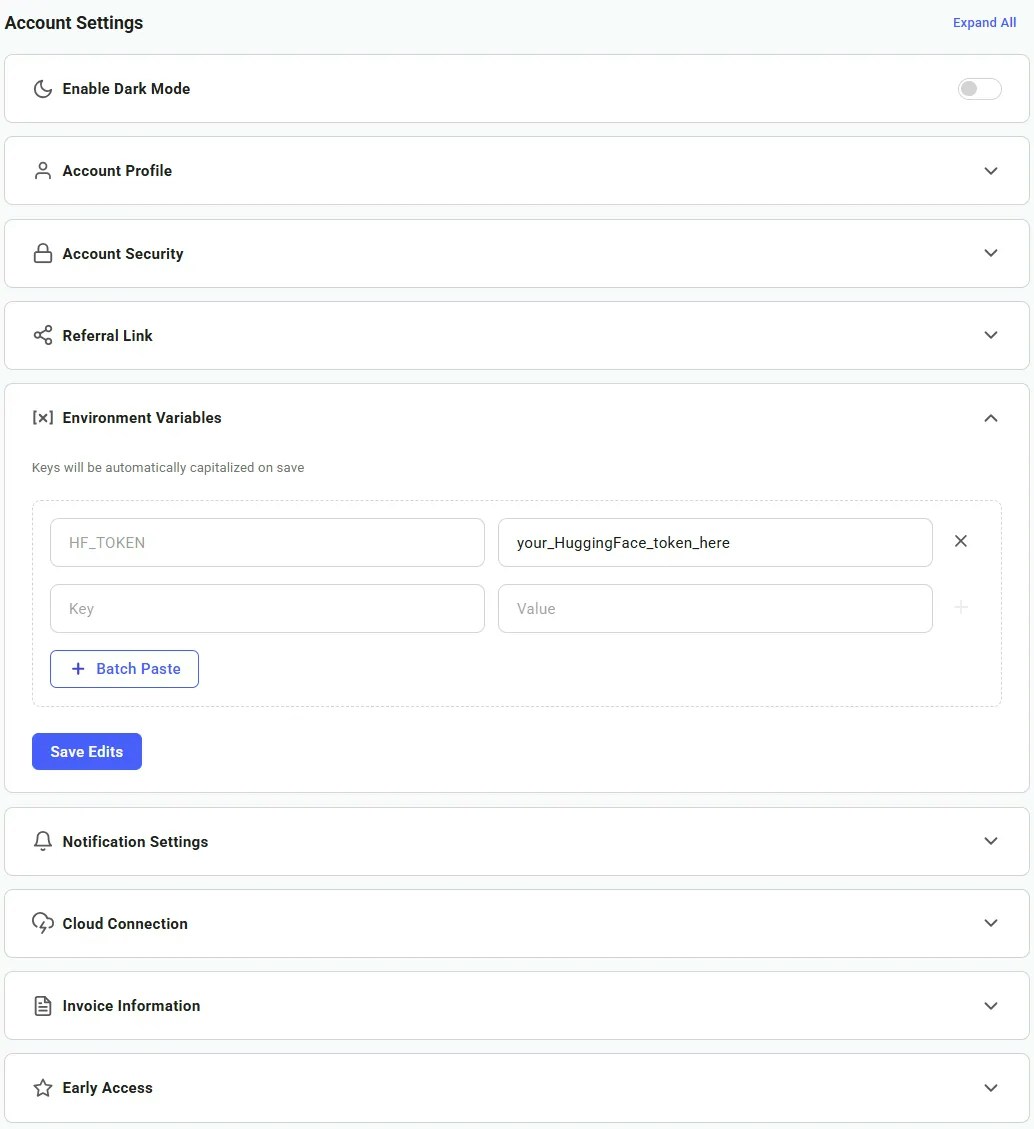
2
Prepare a Template for our Workers
Templates encapsulate all the information required to run an application on a GPU worker, including machine parameters, docker image, and environment variables.Navigate to the Templates Page, select the Serverless filter, and click the Edit button on the ‘vLLM + Qwen/Qwen3-8B (Serverless)’ template. In the Environment Variables section, “Qwen/Qwen3-8B” is the default value for 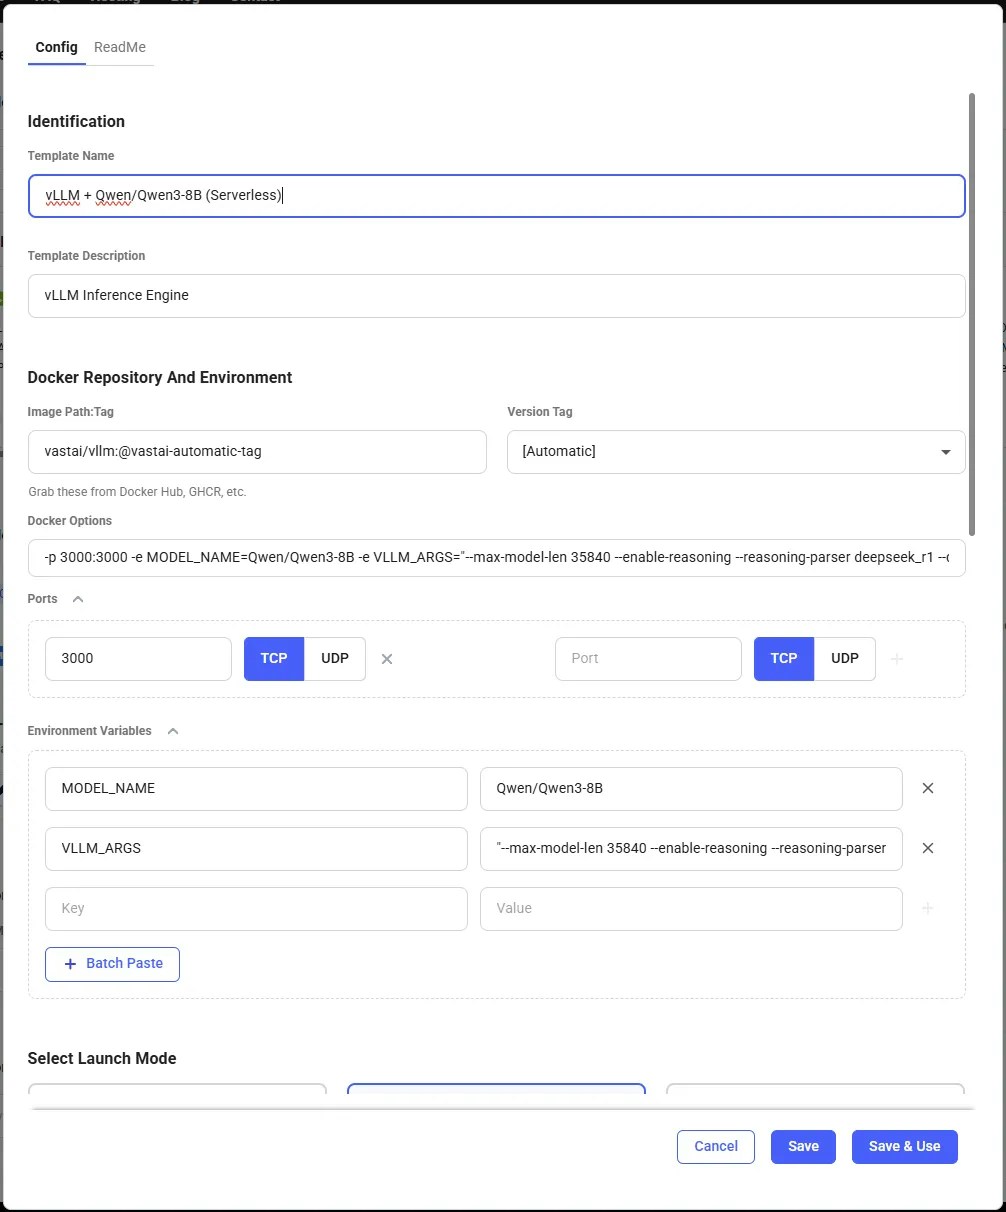
MODEL_NAME, but can be changed to any compatible vLLM model on HuggingFace. Set this template to Private and click Save & Use. The template will now work without any further edits, but can be customized to suit specific needs. Vast recommends keeping the template private to avoid making any private information publically known.
3
Create The Endpoint
Next we will create an Endpoint that any user can query for generation. This can be done through the Web UI or the Vast CLI. Here, we’ll create an endpoint named ‘vLLM-Qwen3-8B ’.
Navigate to the Serverless Page and click Create Endpoint. A screen to create a new Endpoint will pop up, with default values already assigned. Our Endpoint will work with these default values, but you can change them to suit your needs.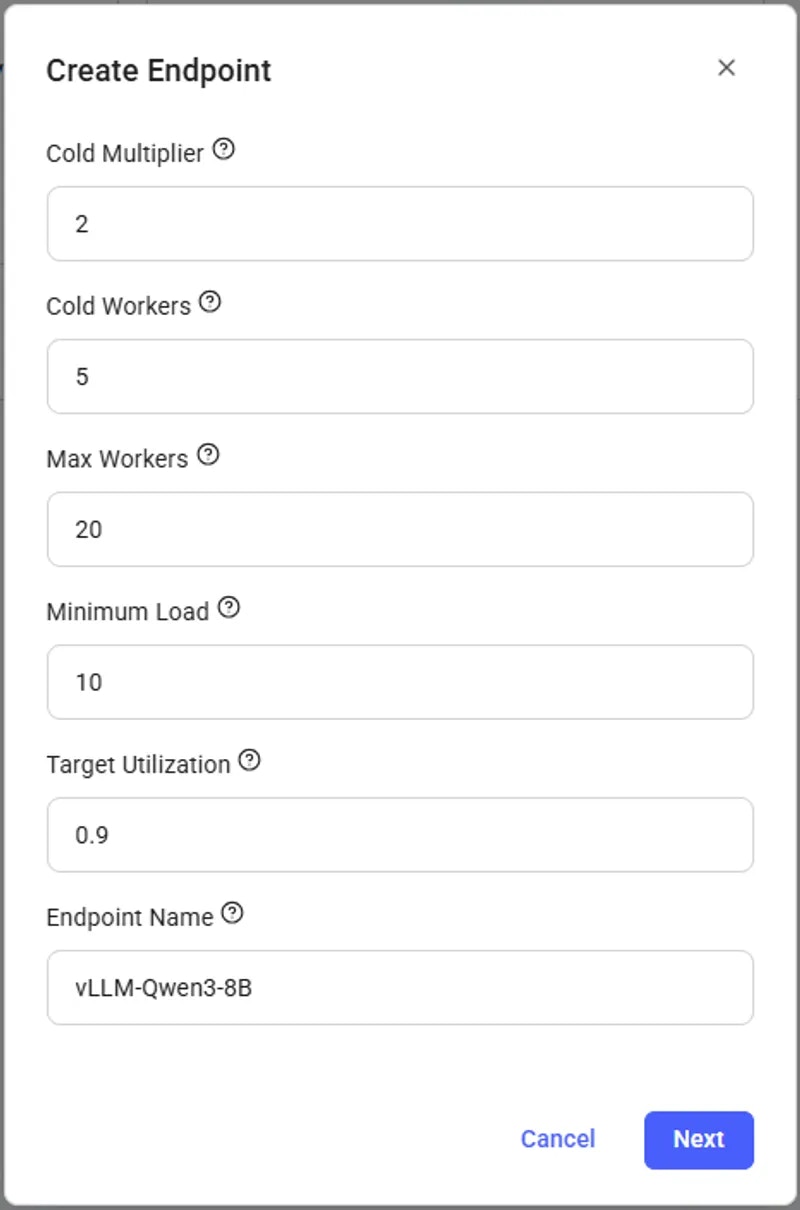
endpoint_name: The name of the Endpoint.cold_mult: The multiple of the current load that is used to predict the future load. For example, if we currently have 10 users, but expect there to be 20 in the near future, we can set cold_mult = 2.- For LLMs, a good default is 2.
min_load: The baseline amount of load (tokens / second for LLMs) we want the Endpoint to be able to handle.- For LLMs, a good default is 100.0
target_util: The percentage of the Endpoint compute resources that we want to be in-use at any given time. A lower value allows for more slack, which means the Endpoint will be less likely to be overwhelmed if there is a sudden spike in usage.- For LLMs, a good default is 0.9
max_workers: The maximum number of workers the Endpoint can have at any one time.cold_workers: The minimum number of workers kept “cold” (meaning stopped but fully loaded with the image) when the Endpoint has no load. Having cold workers available allows the Serverless system to seamlessly spin up more workers as when load increases.
4
Create a Workergroup
Now that we have our Endpoint, we can create a Workergroup with the template we prepared in step 1. Once the Workergroup is created, the serverless engine will automatically find offers and create instances. This may take ~10-60 seconds to find appropritate GPU workers.
From the Serverless page, click ’+ Workergroup’ under the Endpoint. Our custom vLLM (Serverless) template should already be selected. To confirm, click the Edit button and check that the 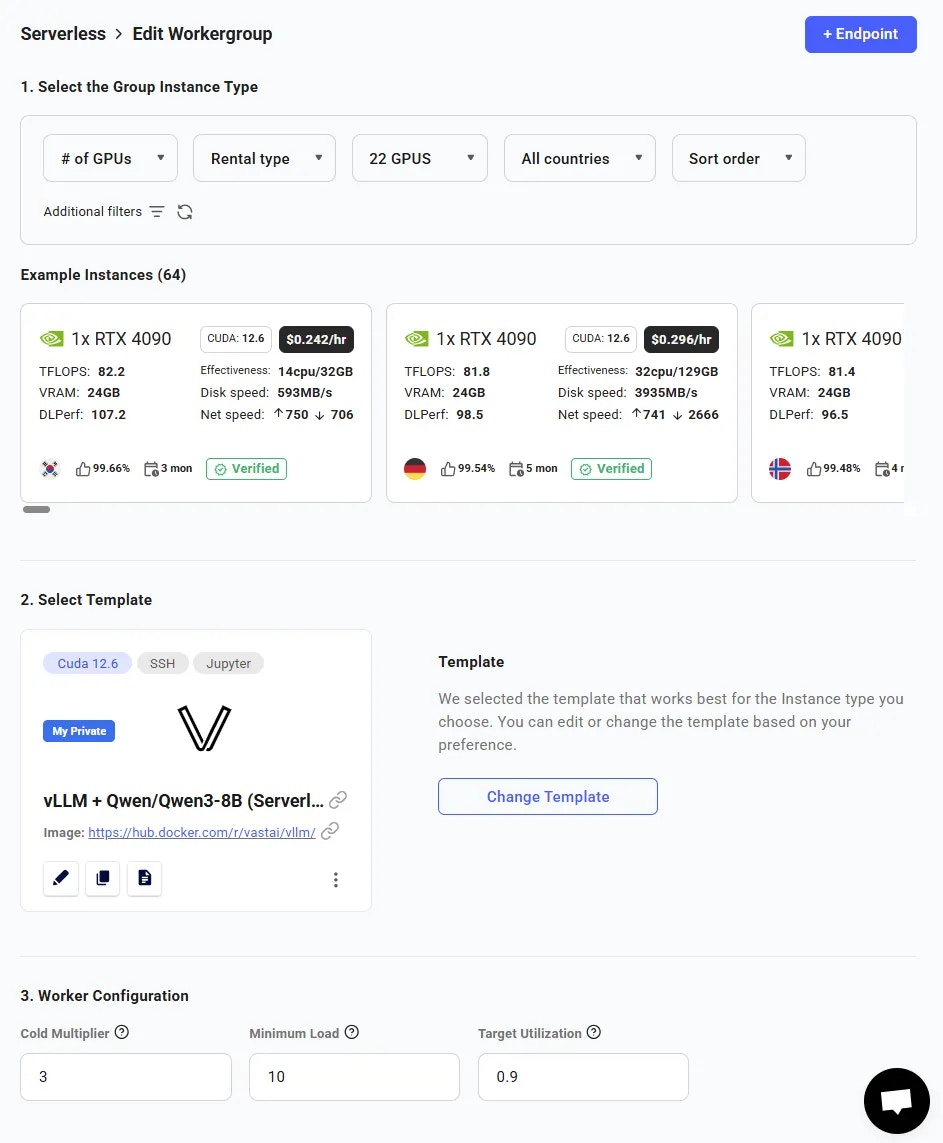
MODEL_NAMEenvironment variable is filled in.For our simple setup, we can enter the following values:- Cold Multiplier = 3
- Minimum Load = 1
- Target Utilization = 0.9
- Workergroup Name = ‘Workergroup’
- Select Endpoint = ‘vLLM-Qwen3-8B’
To see the instances the system creates, click the ‘View detailed stats’ button on the Workergroup. Five workers should startup, showing the ‘Loading’ status:
5
Getting The First Ready Worker
Now that we have created both the Endpoint and the Workergroup, all that is left to do is await for the first “Ready” worker. We can see the status of the workers in the Serverless section of the Vast.ai console. The workers will automatically download the Qwen3-8B model defined in the template, but it will take time to fully initialize. The worker is loaded and benchmarked when the 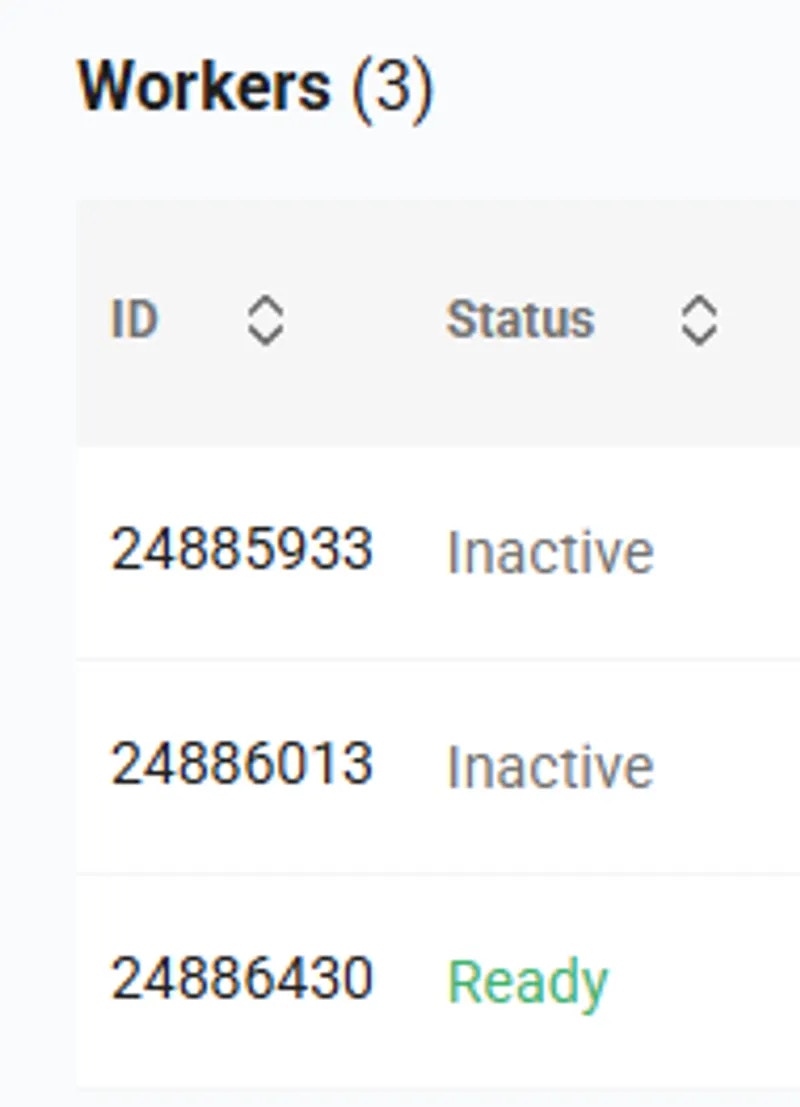
Curr. Performance value is non-zero.When a worker has finished benchmarking, the worker’s status in the Workergroup will become Ready. We are now able to get a successful /route/ call to the Workergroup and send it requests!Using the Serverless Engine
To fully understand this section, it is recommended to read the PyWorker Overview. The overview shows how all the pieces related to the serverless engine work together. The Vast vLLM (Serverless) template we used in the last section already has a client (client.py) written for it. To use this client, we must run commands in a terminal, since there is no UI available for this section. The client, along with all other files the GPU worker is cloning during initialization, can be found in the Vast.ai Github repo. For this section, simply clone the entire repo using:git clone https://github.com/vast-ai/pyworker.git
As the User, we want all the files under ‘User’ to be in our file system. The GPU workers that the system initializes will have the files and entities under ‘GPU Worker’.
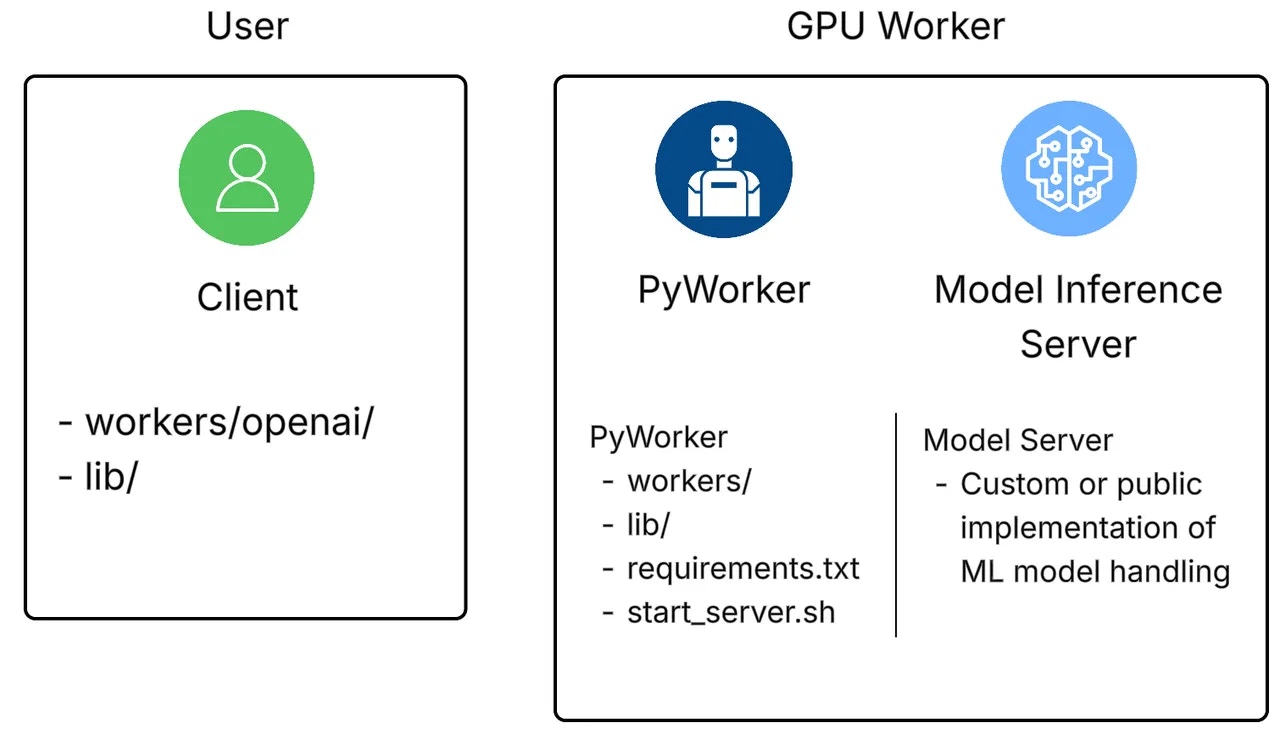
Files and Entities for the user and GPU worker
API Keys
Upon creation of a Serverless endpoint group, the group will obtain a special API key specifically for Serverless. This key is unique to an account, and will be used for all calls to the Serverless engine. This key is different from a standard Vast.ai API key and only works with Serverless endpoint groups.Where to find a Serverless API key:
Use the Vast CLI to find a Serverless API key.CLI Command
show endpoints command will return a JSON blob like this:
Javascript
Install the TLS certificate \[Optional]
Install the TLS certificate \[Optional]
Install the TLS certificate [Optional]
All of Vast.ai’s pre-made Serverless templates use SSL by default. If you want to disable it, you can add-e USE_SSL=false to the Docker options in your copy of the template. The Serverless Engine will automatically adjust the instance URL to enable or disable SSL as needed.- Download Vast AI’s certificate from here.
- In the Python environment where you’re running the client script, execute the following command:
python3 -m certifi - The command in step 2 will print the path to a file where certificates are stored. Append Vast AI’s certificate to that file using the following command:
cat jvastai_root.cer >> PATH/TO/CERT/STORE - You may need to run the above command with
sudoif you are not running Python in a virtual environment.
This process only adds Vast AI’s TLS certificate as a trusted certificate for Python clients. For non-Python clients, you’ll need to add the certificate to the trusted certificates for that specific client. If you encounter any issues, feel free to contact us on support chat for assistance.
1
Running client.py
In client.py, we are first sending a POST request to the The The worker hosting the Qwen3-8B model will return the model results to the client, and print them to the user. To quickly run a basic test of the serverless engine with vLLM, navigate to the This should result in a “Ready” worker with the Qwen3-8B model printing a Completion Demo to your terminal window. If we enter the same command without —completion, you will see all of the test modes vLLM has. Because we are testing with Qwen3-8B, all test modes will provide a response (not all LLMs are equipped to use tools).
/route/ endpoint. This sends a request to the serverless engine asking for a ready worker, with a payload that looks like:Javascript
cost input here tells the serverless engine how much workload to expect for this request, and is not related to credits on a Vast.ai account. The engine will reply with a valid worker address, where client.py then calls the /v1/completions endpoint with the authentication data returned by the serverless engine and the user’s model input text as the payload.JSON
pyworker directory and run:CLI Command
client.py is configured to work with a vast.ai API key, not a Serverless API key. Make sure to set the
API_KEY variable in your environment, or replace it by pasting in your actual key. You only need to install the requirements.txt file on the first run.CLI Command
2
Monitoring Groups
There are several endpoints we can use to monitor the status of the serverless engine. To fetch all Endpoint logs, run the following cURL command:Similarily, to fetch all Workergroup logs, execute:All Endpoints and Workergroups continuously track their performance over time, which is sent to the serverless engine as metrics. To see Workergroup metrics, run the following:These metrics are displayed in a Workergroup’s UI page.
Bash
Bash
Bash
3
Load Testing
In the Github repo that we cloned earlier, there is a load testing script called
workers/openai/test_load.py. The -n flag indicates the total number of requests to send to the serverless engine, and the -rps flag indicates the rate (requests/second). The script will print out statistics that show metrics like:- Total requests currently being generated
- Number of successful generations
- Number of errors
- Total number of workers used during the test
requirements.txt are installed, and execute the following command:SH